Sample collection cards in the DRIfT Test Kit
There are 2 sample collection cards in your test kit, each with 4 sample collection circles, therefore, you are required to collect 8 spots of blood in total. Both cards have the same barcode on them, so you only need to register your test kit once on your account. The cards are all suitable for analysis of Vitamin D, Omega-3 Index, HbA1c and Homocysteine.
How to Register Your Test Kit
Your sample collection cards have a unique barcode on them which the lab will use to track your sample collection card through the analysis process and reporting of results. Please keep a note of the barcode.
It is important to register your sample collection card on the Food For The Brain Foundation website before collecting your blood spots.
Please log in to your account on the Food For The Brain Foundation website and go to Tests and books, then select Test Kit Registration on the drop down menu. Select “DRIfT (4-in-1)” from the options. You can also reach the registration page by typing in foodforthebrain.org/start in the search bar.
Alternatively log in to your account on the Food For The Brain Foundation website and scan the QR code on the Instructions For Use. Please note you must be logged in first for the QR code to take you to registration.
Do I need to fast?
Yes. Please collect all blood spots in the fasted state (allow 12 hours after last food or drink) and avoid coffee, alcohol and supplements, especially B vitamins, as these may affect your results.
Important Points to Note
Please follow the instructions for use thoroughly, in particular for registering your test kit, warming up to ensure the blood spots are generous and allowing the blood spots to dry before folding your sample collection cards.
Understanding Your DRIfT Progress Report & DRIfT Score
The blood tests (Omega-3 Index, Vitamin D, HbA1c and Homocysteine) represent fundamental drivers of health which, if out of balance, may predict and lead to future health issues such as cognitive decline.
You will find your DRIfT Progress Report and DRIfT Score on your “DASHBOARD”. Log in to your account, click on “DASHBOARD” and scroll down to the bottom of the screen. See the example below.
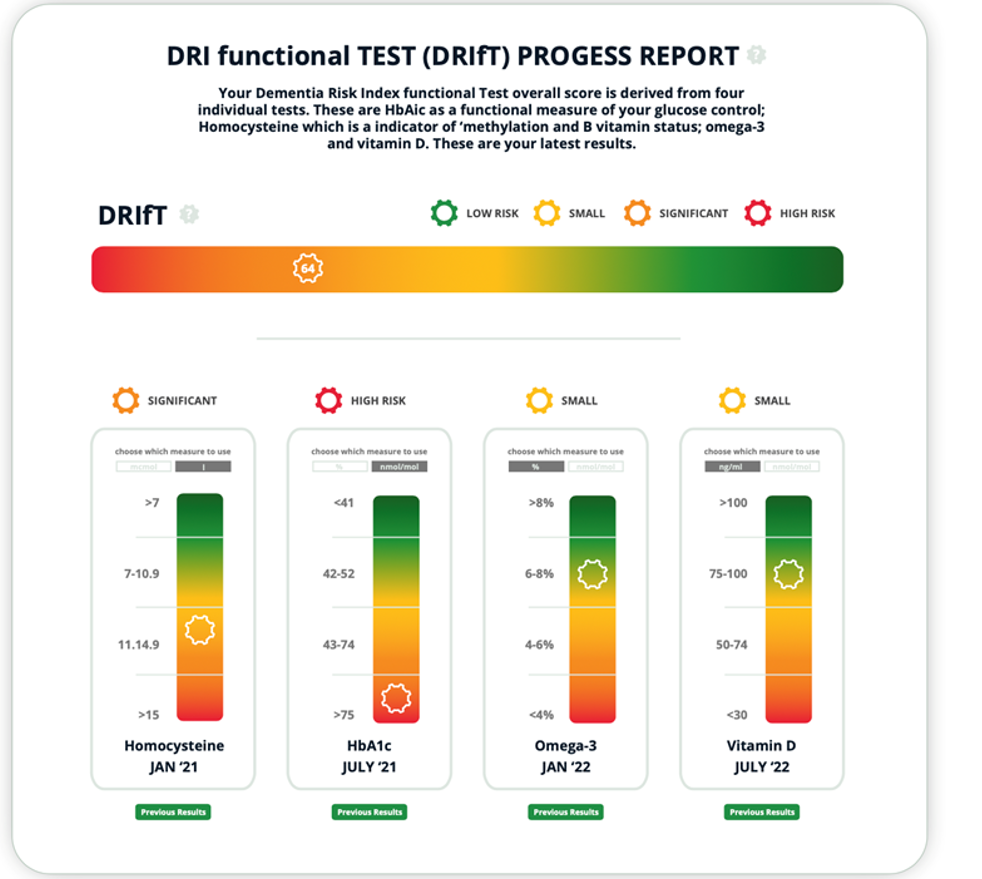
Your DRIfT Score is presented graphically on the horizontal bar by the cog with your DRIfT score within it and it is an index, out of 15, that combines your five blood test scores to give you an indication of your health resilience. If you are in the red zone for an individual blood test, e.g. vitamin D, you score 3, orange is 2, yellow is 1, and green is 0. Therefore, if you are ‘high risk’ on all five, your DRIfT Score will be 15 (5 x 3) – in the red. If you score green on all blood tests, your DRIfT Score will be 0 (5 x 0) – in the green.
We assume ‘innocent until proven guilty’ – in other words, if you’ve only done two blood tests and both were ‘high risk’, your score would be 6 (2 x 3), putting you in the ‘yellow’ zone (we assume the tests you haven’t done score 0). We recommend you retest at least annually, although if your score is not good and you make improvements, you will see the changes within 3 months, so retest then, and this can adjust your results accordingly.
